
Summit of Fuji shortly after sunrise
Also known as: Fuji-san, Japanese: 富士山
Significance: Highest Point in Japan, high point of the island of Honshu
Nearest Higher Neighbour: Xueshan - Beilengjiao, Taiwan
Elevation: 3,776m
Date “climbed”: September 3rd 2025
Coordinates: 35° 21' 38'' N, 138° 43' 38'' E
Links: Wikipedia (Japan, Honshu, Mount Fuji), Peakbagger, Fuji Mountain Guides
It took us a few months to decide on what our big trip should be to celebrate my 50th birthday. The ascent of Mount Toubkal for my 40th had set a high bar, so it was hard to find something to match it. As Toubkal was over 4,000m, my first thought was to do a peak higher than 5,000m. Timea quickly vetoed Mount Ararat (5,137m) as it was a bit too near a conflict zone. Several similar ideas were also rejected for other quite sensible reasons.
When we came upon the idea of two weeks in Japan with a climb of Mt. Fuji plus two parkruns, it was an immediate “Hell Yes!”. Timea hadn’t been to Japan before but wanted to go for a long time. I had been once before, but it was 18 years ago, and I didn’t do Fuji. I was very excited to bag another iconic mountain.
We booked the Fuji part of our Japan trip with Fuji Mountain Guides, who specialise in English language treks. I honestly can’t recommend them highly enough, as the experience was excellent from the booking process through to the end-of-hike wrap-up.
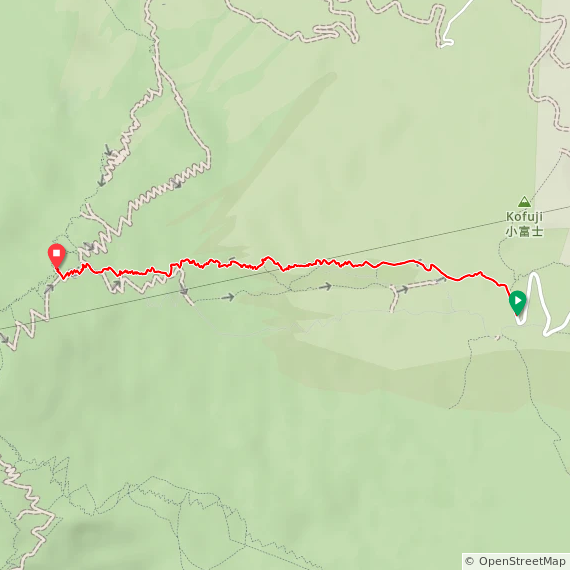
While many hikers flock to the popular Yoshida Trail, a more serene and equally rewarding alternative is on the eastern side of Japan's most iconic peak: the Subashiri Trail. Offering a unique and much less crowded experience, this route is a favourite among hikers seeking a more intimate connection with the mountain.
Day 1: Subashiri 5th Station to 8th Station
Date: September 2nd 2025
Start: Subashiri 5th Station
Finish: Fujisan Hotel, 8th Station
Distance: 5.3 km (3.3 miles)
Elevation change: +1,373m
GPX File: get via Buy Me a Coffee
Other Routes Touched: Yoshida Trail
Our journey began at Gotemba Train Station, one of the pick-up points for Fuji Mountain Guides. We were staying in a ryokan in Hakone, so it was a convenient place to get to. Others in the group had already been picked up in Tokyo.
The first stop was the Fuji Mountain Guides base, a 15-minute drive from the station. The guides checked the mandatory kit, and we picked up the hiking poles that we rented from them. From there, it was another 25-minute drive up through the forest road to the 5th Station.
The trail begins at the Subashiri 5th Station, at an elevation of approximately 2,000 meters. After a final toilet stop and a chance to buy some more food and a souvenir wooden walking stick, we had the hike briefing and started the ascent at 11 a.m.
One of the defining features of the Subashiri Trail is its first half, which winds through a lush forest of Veitch's fir and Erman's birch. This shaded path provides a welcome reprieve from the sun and offers a stark contrast to the barren, volcanic landscape of the higher elevations. This forested section continues until around the 7th Station, where the trail opens up, providing expansive views of the surrounding landscape and views to Lake Yamanaka and the towns of Oshino and Fujiyoshida to the north-east.
Although the group was quite large, 40 people, it never felt crowded as the different walking paces thinned us out during the first hour. The six guides spaced themselves among the group, so there was always one of them close by.
The Subashiri Trail is considered an intermediate route, slightly more challenging than the Yoshida Trail due to its lower starting elevation and a greater overall elevation gain of about 1,750 meters. The ascent typically takes five to seven hours, with a total distance of approximately 6.9 km (4.3 miles). We were at the slower end of this, but we got to the 8th Station comfortably before dark (around 6 p.m.).
As you ascend, you'll encounter a number of mountain huts where you can rest, buy food and water, and have your walking stick stamped. Be aware that the huts only take cash, and prices for food and drink are higher than in normal Japanese shops. However, with a favourable pound-to-yen exchange rate, it was still no more than UK prices.
It's important to note that the ascent and descent paths are different for a large portion of the trail, which helps manage foot traffic. However, the Subashiri Trail merges with the Yoshida Trail at the 8th Station, where the crowds can increase significantly, especially during peak season.
By the time we reached the 8th Station, the group had reduced to 36. Four of the group had turned back before the first hut. One of them was an American guy that I was chatting to on the first section. He was doing the hike as a new goal after a heart attack 18 months before. While it was a great goal, he was clearly not fit or prepared enough for such a demanding hike. The guides told us that it’s unusual for the whole group to complete the full trek.
Our early evening at the 8th Station Fujisan Hotel (not a hotel) consisted of being assigned our sleeping area, changing clothes, dining on a boil-in-the-bag beef curry, and having a briefing for the morning hike. We went to bed at 20:00 to get some sleep ahead of the next day’s hike.
There was no real sleep, though. A mix of a thin mattress, a slight lingering headache, and the constant rumble of snoring and rustling from the group kept us awake. Timea and I probably got about 10 minutes of sleep each. On the plus side, I did manage to listen to a whole audiobook while I wasn’t sleeping.
Our wake-up call from Dan, our head guide, was at 02:30. We were already up and ready, though, as the loud preparations of some of the others at 01:00 meant there was no more rest to be had.


Day 2: 8th Station to Summit and descent to 5th Station
Date: September 3rd 2025
Start: Fujisan Hotel, 8th Station
Finish: Subashiri 5th Station
Distance: 10.4 km (6.5 miles)
Elevation change: +357m / - 1,740m. Net -1,383m
GPX File: get via Buy Me a Coffee
Other Routes Touched: Yoshida Trail
The final push to the summit began at 03:05. As we made our final preparations outside the 8th Station, we could see the lights of Tokyo in the distance and lightning through the clouds on the horizon.
Rather than being spread out at different speeds on the first day, the group kept together with a very slow pace. In the second hour, we saw some big groups already descending. This made our guides concerned about conditions on the summit. It turned out, though, that they had started too early and summited way before sunrise. Our guides were better organised, though, and timed our ascent to get us to the Torii Gate exactly at sunrise.
In the Japanese Shinto religion, the sunrise holds profound significance, as it is seen as the daily rebirth of Amaterasu Omikami, the sun goddess and central deity. Amaterasu is believed to have been born from the left eye of the creator god Izanagi, and her light is considered the source of all life and purity. Therefore, the act of witnessing the sunrise is a form of worship and a ritual of purification known as "misogi," allowing practitioners to cleanse themselves of spiritual impurities and renew their connection with the divine. The rising sun, with its vibrant red disc, is also a powerful symbol of Japan itself, often referred to as "the land of the rising sun," representing hope, renewal, and the enduring spirit of the nation.
Fuji sunrise was also significant for us. It was the centrepiece of my 50th birthday celebrations and a challenge that Timea had been training for several months. During our planning for the trip, we agreed that if Timea wasn’t able to make the summit, then she would stay at one of the huts while I would complete the ascent. While this would have been OK, it was particularly special that we could reach the top and see the sunrise together.
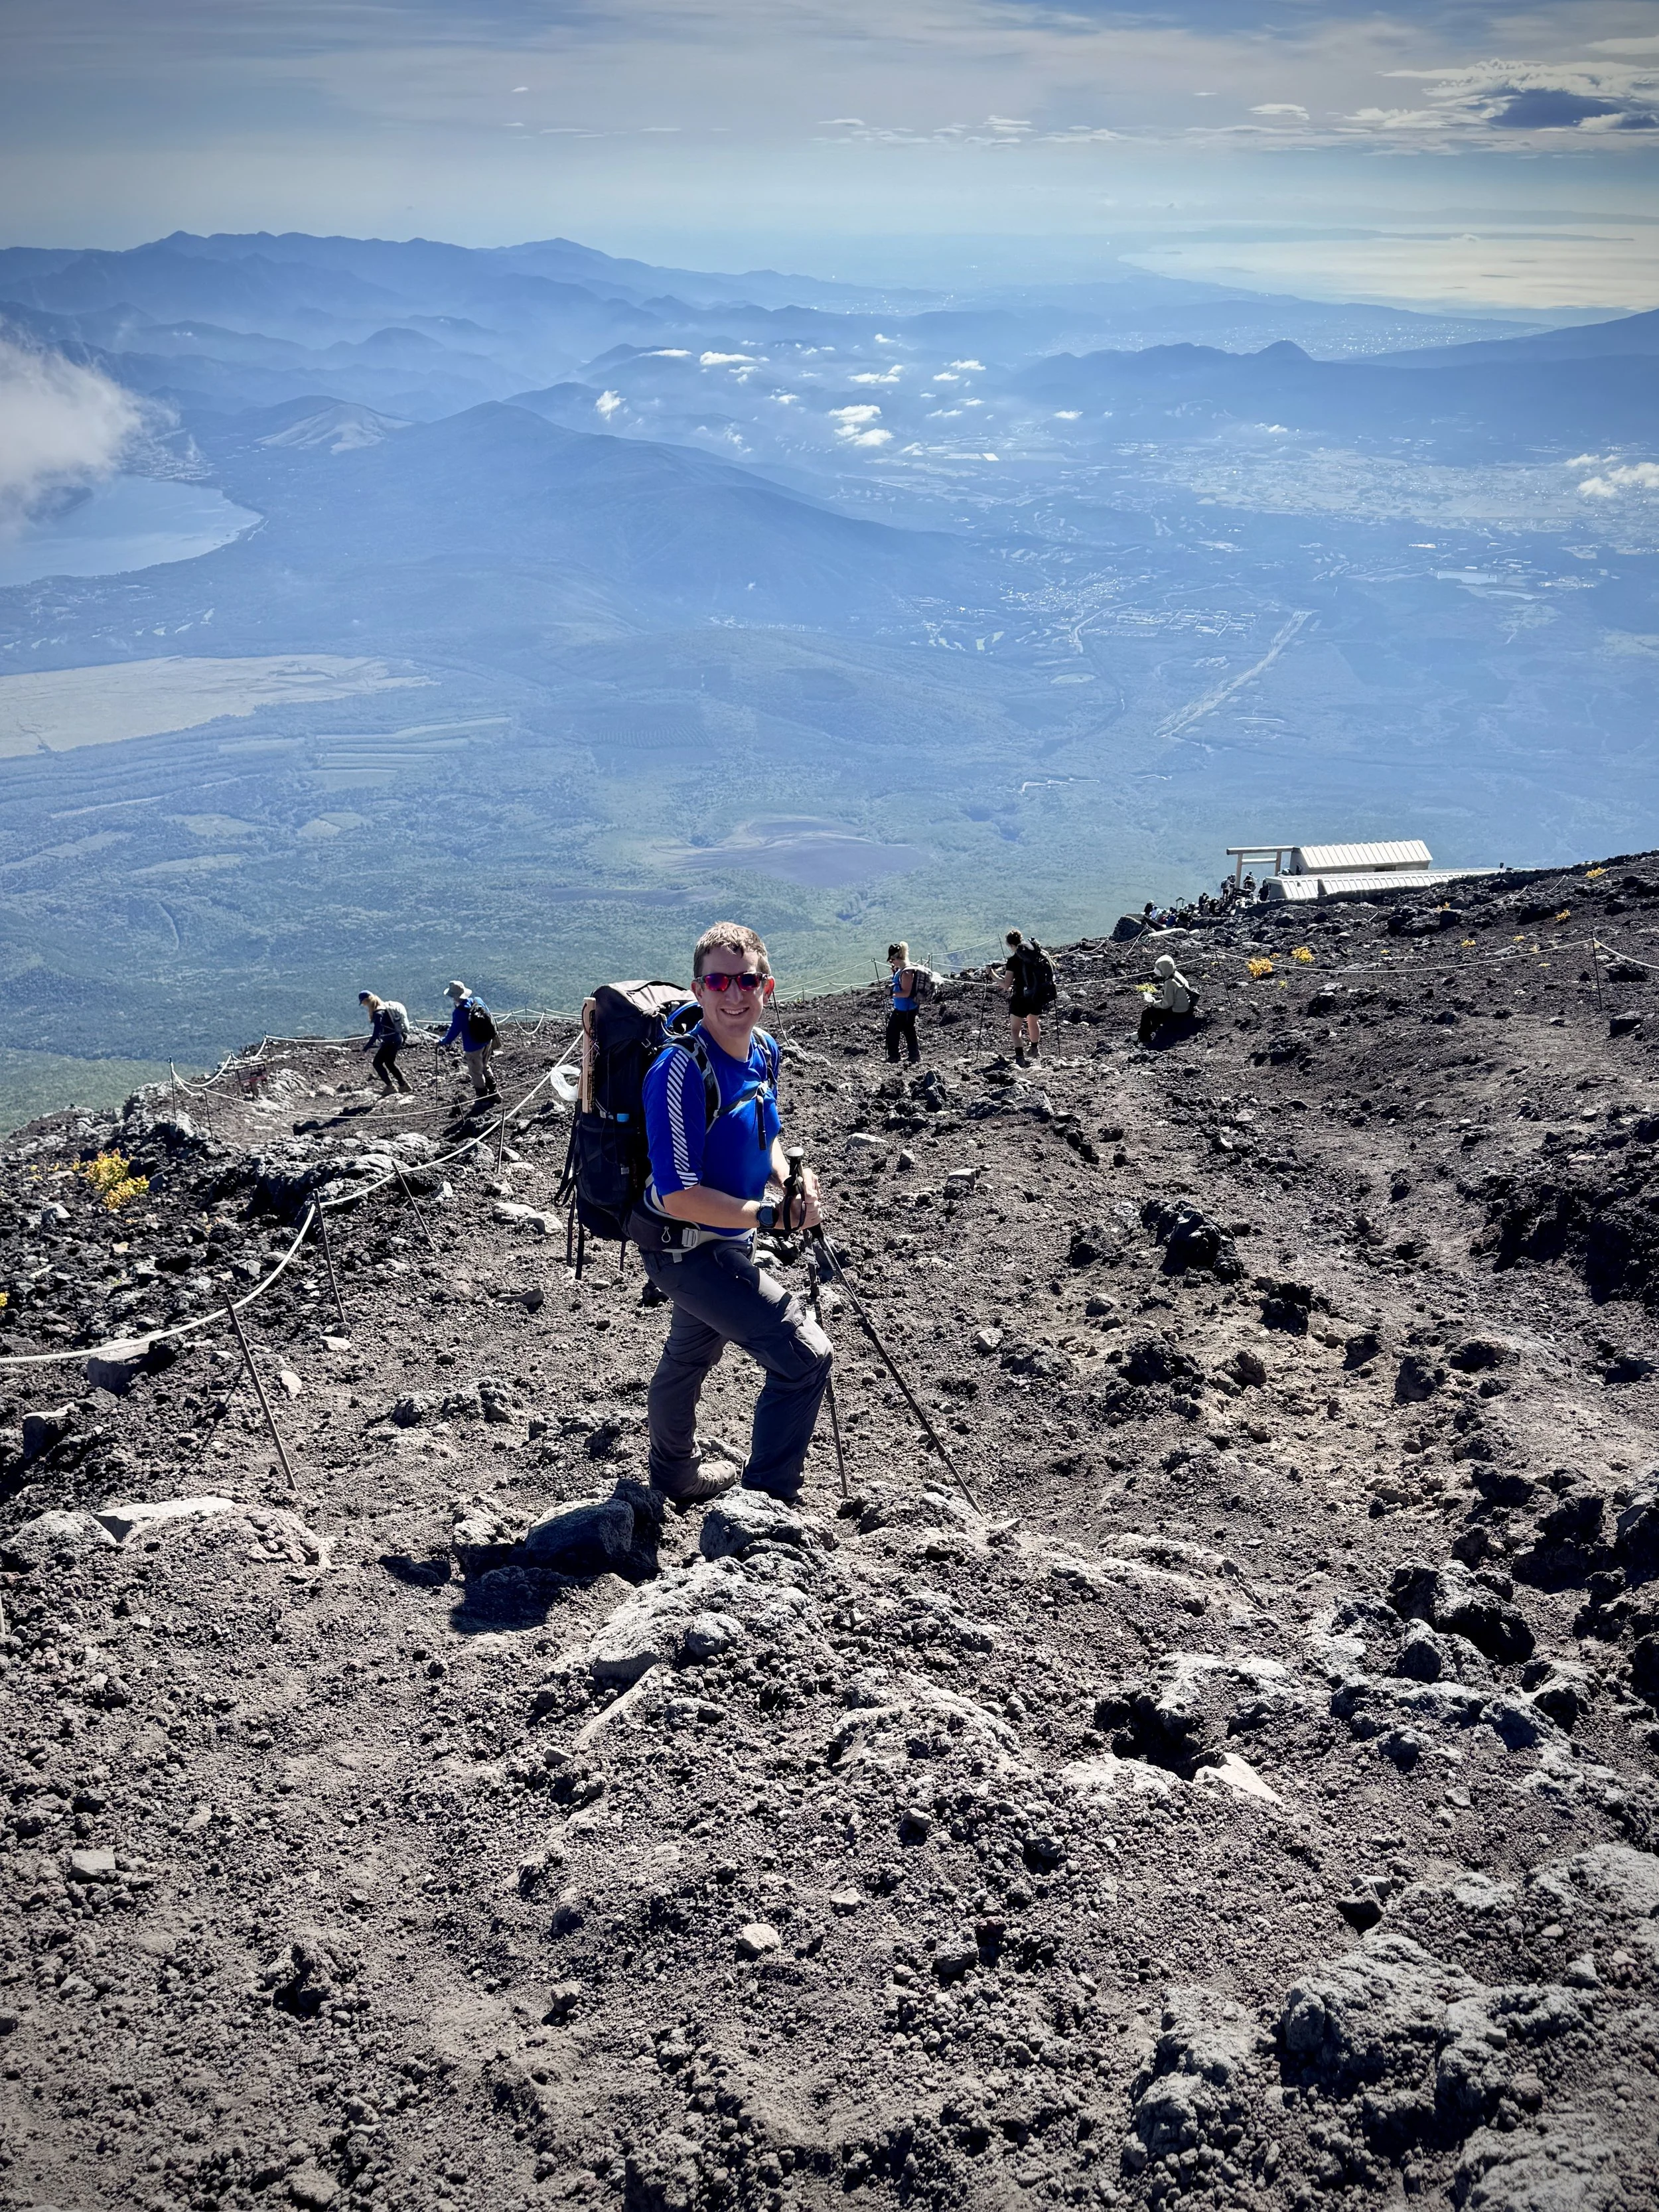
Although the weather at the summit was better than the guides feared, there were still strong winds and heavy mist at the crater rim. In good conditions, they take some of the group on a circuit of the crater, but that wasn’t an option that day. Even so, we still managed to have enough time to get our stick stamped, walk to the highest point of the eastern edge, and get photos at the Shinto Shrine and Torii Gate. We would have loved to have spent more time there, but the guides knew what they were doing, so we followed their instructions and started the descent.
What we didn’t realise until after the trip was that the highest point of 3,776m was on the other side of the crater. It actually has its own name: Mount Kengamine. Although I was a bit disappointed not to get there, I was happy with reaching the high point of the eastern edge at 3,744m. We got as high as we could based on the weather. Given the unpredictability of the conditions, you’d have to be very lucky, or do multiple attempts to get to 3,776m. As it turned out, a typhoon was approaching that cancelled all ascents a day later. We were very lucky and grateful that we had the chance to do the trek at all.
The first part of the descent back to the 8th Station took just 30 minutes versus the two hours to ascend earlier. We stopped for breakfast and took some layers off to continue down towards the 5th Station.
The descent is where the Subashiri Trail truly stands out. From the 7th Station onward, the path becomes a unique and exhilarating experience known as "Sunabashiri" or "sand running." This section is a steep, long slope of soft volcanic gravel, allowing hikers to descend at a quick, almost running pace. While it's a fun and fast way to get down the mountain, it requires careful footing and is a test for your leg muscles. This "run" can drastically shorten your descent time, with the entire return trip taking as little as 2.5 to 4 hours.
By the time the trail levelled out after the sand running, Timea’s left knee started hurting. It was similar to the pain she had on Toubkal 10 years before. Back then, she was able to take a donkey for the rest of the descent, but there are no donkeys on Fuji.
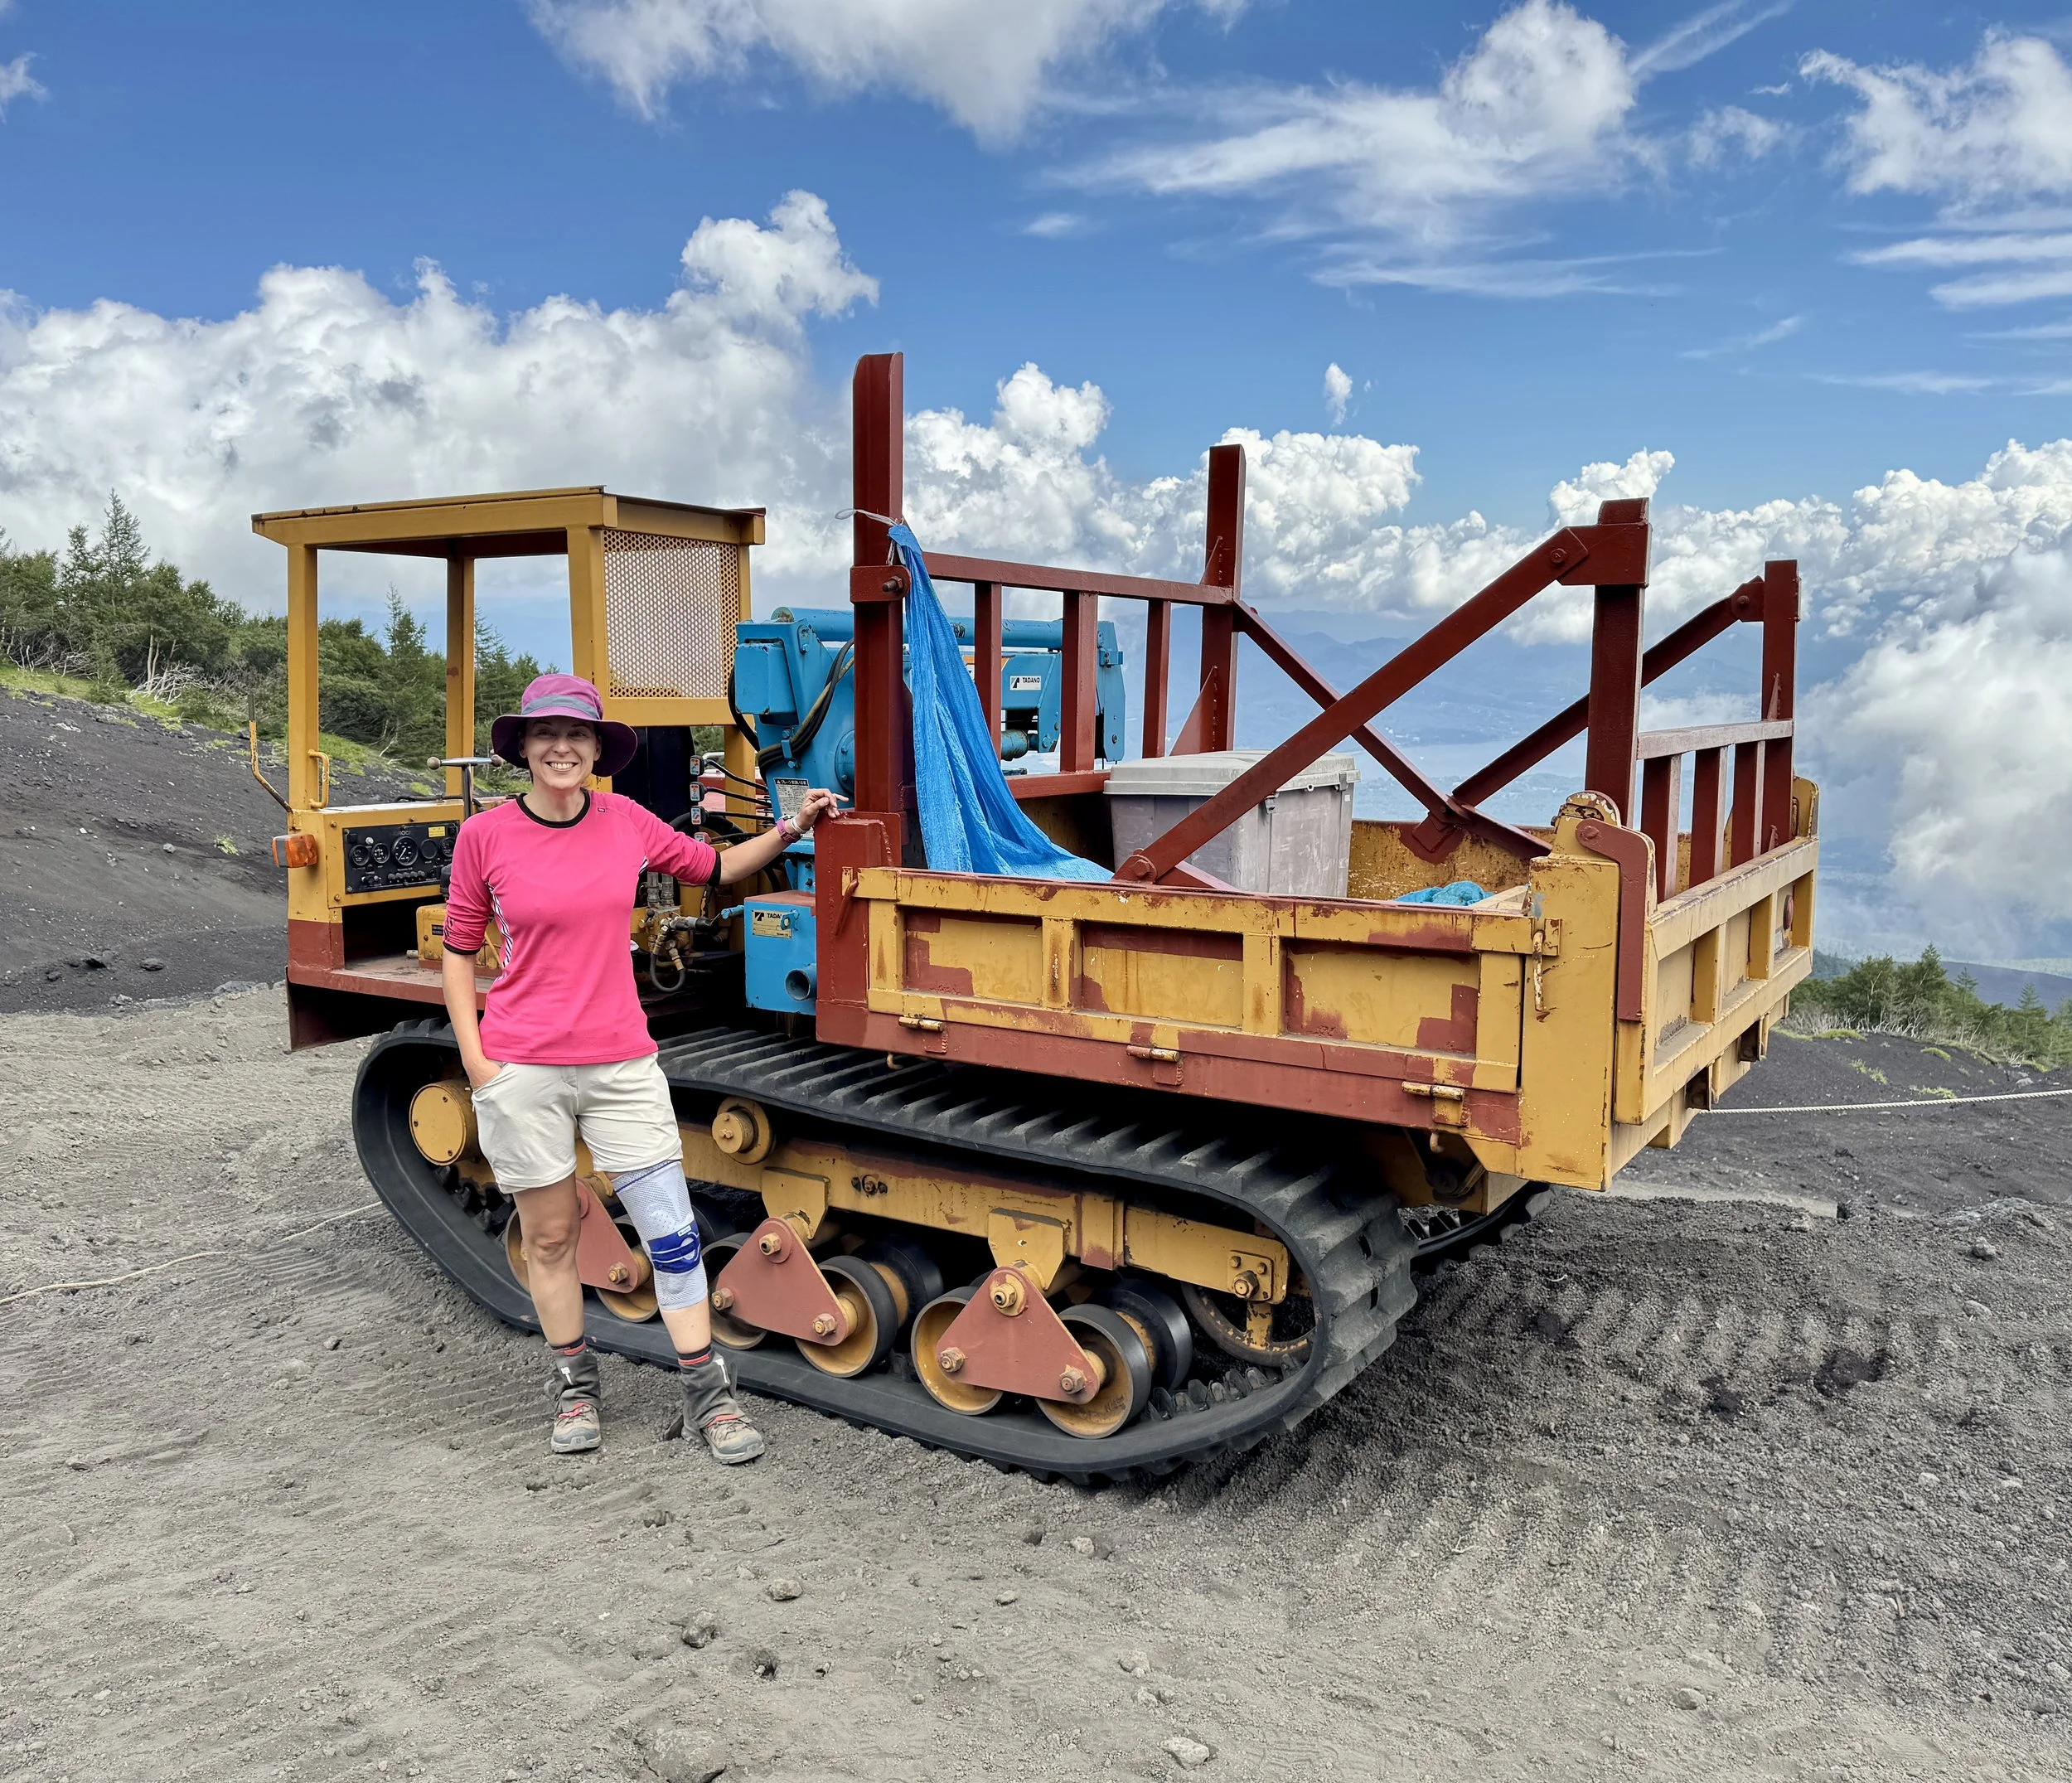
For those in real trouble, the emergency evacuation is via one of the bulldozer trucks that takes supplies up to the huts. Four of the group ended up taking the bulldozer down, but Timea’s knee wasn’t so bad. She got through it by taking it slow, some stretching, and a bunch of painkillers.
We were grateful for Scott, one of the guides, for watching out for us and two other slower couples in the final hour. After the 5th Station, he took us on a lesser-known shortcut, called the “mushroom trail,” that avoided the stone steps with a more gradual route through the woods.
We were tired, dirty, and thankful that we had booked a day and a half of rest back at the ryokan with our very own onsen in Hakone. Our thanks go to the six members of Fuji Mountain Guides who made our trek a safe, fun, and memorable adventure.


Top Tips: things we learnt on the hike
If you have any allergies, it’s best to take your own food. Timea is both dairy and gluten-free, and there were limited options for her at the stations.
Breakfast at the 8th station was advertised as pastries. You can buy these (packaged, not fresh), but there were a range of other hot and cold options too (for example, rice with beef, ramen noodles, etc.).
Take both salty and sweet snacks. Salty is great for replacing salts in your body, and sweet (e.g., Haribo) is great for the summit.
I’m not a big fan of either gaiters or walking poles, but both are essential for Fuji. I rented poles but only used them for the descent. I didn’t use gaiters but wish that I had, as I had both boots full of volcanic ash and stones after the scree-run.
If you get into real trouble and can’t walk down, the bulldozers are your emergency option. Helicopters are not allowed to land on the mountain, so your evacuation may take some time. The bulldozers are mainly used to take supplies to the huts and can be used to take you down if you are injured. It’s a slow and bumpy trip, so you really don’t want to do it, despite how much fun it may sound. Bulldozer evacuation costs around £80 to £100 per person.
It should be obvious, but don’t hike Fuji in new boots. We met one hiker with new boots that she had only used once before in a very short walk at home. They would have rubbed a lot later in the hike.
Even if you have well-worn-in shoes, take blister plasters.
Take electrolytes to add to your water bottle or CamelBak. We lost five litres of sweat according to our Garmin watches.
Take dry roll-on sun lotion, especially for the descent. Sand and ash will stick to liquid lotion.
The huts take cash, not cards, so take enough for the two days, remembering that prices are higher than normal Japanese shops. Most toilets take coins, but you can get change from the huts when buying food and drink.
Bring wet wipes to clean yourself when getting changed in the 8th Station. There are no showers.
Bring leaf soap, as the toilets don’t have any soap, only water.
Only take up to 1 litre of water to drink between huts and buy more along the way. This will reduce the weight that you need to carry.